The first part of this discussion applies primarily to nonferrous metals, especially alloys based on copper, silver, or gold, and iron and steel will be reviewed below. This distinction is a function both of the different crystal structures of the two alloy groups, and also because much ancient iron, especially in the west and in Africa has been produced by a direct bloomery process and has not been molten in bulk.
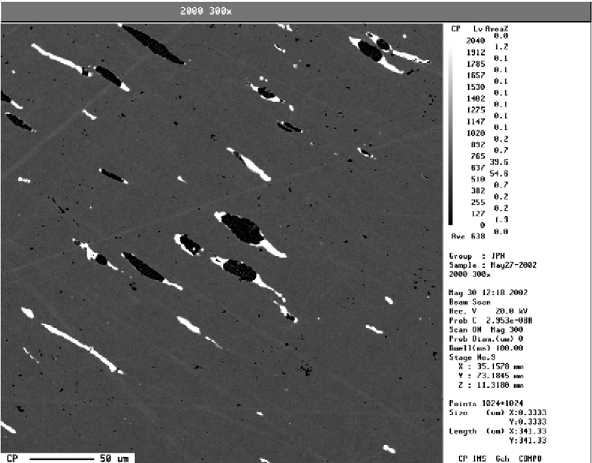
The macro - and microsegregation following on casting of nonferrous metals and alloys (and also in cast irons) are readily displayed with the correct etch. This may take some selection since etching response can be radically affected by the presence of specific impurities, for example, antimony and iron in bronze. The etching of cast structures also permits some estimation of process variables, especially cooling rate. This controls the scale of the microstructure, for example, dendrite arm spacing or cell size, and the size and dispersion of included phases, and also the retention of metastable phases or structures. These features can also usefully be mapped using backscat-tered electron imaging in the scanning electron microscope with atomic number contrast, and by elemental mapping in the electron microprobe (Figure 2). This, in turn, can give some information on other factors, for example, the mould type and material, when no other

Figure 2 Backscattered electron image in atomic number contrast of inclusions in copper drift pin; high atomic number elements (lead, bismuth) show white.
Evidence is available. Subsequent steps in processing can be identified may be more or less easily: while the effects of heat in homogenizing a structure, whether deliberately as a heat treatment or accidentally in a fire, are usually very clear, seeing when a cast structure has been deformed through cold work is often problematic, it simply being difficult visually to detect small distortions of a dendrite.
When a cold worked structure is heat treated (annealed) at a sufficient temperature a new, strain-free grain structure nucleates and grows. In alloys that share the crystal structure (face-centered cubic) of copper, silver, and gold this structure is particularly distinctive, with polygonal equiaxed grains crossed by parallel-sided bands which are growth defects called twins. When this grain structure is itself cold worked the effects of deformation can be picked out by etching in the form slip traces (lines) or deformation twins (narrow lenticular bands), followed by deformation of the grains and ultimate destruction of any clear structure. By comparing these results with those from experimentally deformed alloys of the same type this can be quantified so that the amount of cold work can be measured and, coupled with estimating the elongation of ductile inclusions, the working history of the sampled area can be estimated. Observations of the mechanical behavior of the alloys may be supported by microhardness testing; in studying material from industrial archaeological contexts larger sections may be available for study and mechanical testing undertaken.
Other variables can be also be quantified: metallo-graphic and microanalytical observation of segregation can provide a determination of heat treatment temperatures as the distributions of different elements are homogenized at different temperatures. The recrystallized grain size is a function of annealing time and temperature and prior cold work: very large grain sizes can be indication of exposure to high temperature during a fire or cremation. If the heating is under oxidizing conditions a band of oxide inclusions may form below the metal surface; in extreme cases there may be visible signs that the metal has begun to melt. Optical metallography (supported by SEM) can also be used to characterize other aspects of metalworking such as plating, patination, and joining techniques, even where much else is corroded. Indeed, the characterization of intermetallic inclusions in corroded tin alloys such as pewter and solder may be the only guide to what was originally intended.
Wrought iron, cast iron and steel are not always so rich in directly diagnostic microstructural features as, say, copper-based alloys. Even in antiquity carbon was not the only element alloyed with iron, phosphorus being the most important. Because the impact and interaction of these elements is not always readily visible in the microstructure it is true to say that metallography of iron is incomplete with a partnership with microanalysis, and with elemental mapping at both micro - and macroscales. Such mapping can also identify features such as weld lines which are otherwise effectively invisible; also some of the diagnostic species are immobile during corrosion, so structural features can be followed into corroded areas, or even located in completely corroded material.
Methods of working are different with hot forging of wrought alloys the norm rather than, with few exceptions, the cold working characteristic of nonferrous alloys. A second difference, in steels with sufficient carbon, lies in the importance of quenching to transform the microstructure athermally to produce hard and strong martensitic structures, whose properties can be improved by low temperature heat treatments called tempering. (Martensites also occur in nonferrous metals but in archaeological contexts are confined to high tin bronzes). Here, too, nonmetallic inclusions hold important information about production history: these include slag from the bloomery or puddling processes or forge welding, or sulphides in iron smelted by coal-, or coke-fired blast furnaces, in the west an indication of recent date. Also, as with nonferrous metals, a metallographic study should be supported by hardness and, if possible, other mechanical testing.


 World History


